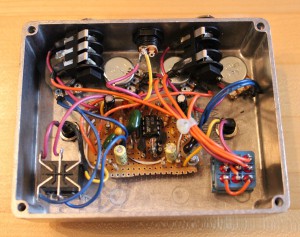
Intro to DIY Pedal Building

Then hopefully later, I’ll go back and do a project showing how to build a simple boost pedal from scratch.
Here’s the table of contents for the whole DIY pedal building series:
- Intro to DIY Pedal Building
- Beginner’s Course in Sketchup, Modeling a 125B Guitar Pedal Enclosure
- Drilling a 125B Guitar Effects Pedal Enclosure
- Pedal Enclosure Finishing: Surface Prep, Priming and Painting
- Using GIMP to Create Pedal Artwork
- Printing and Applying Waterslide Decal to Pedal Enclosure
This first video is the motivational intro: here are some of the things I’ve done, and yes, you can too! If you have some interest in electronics and guitars, what better way to improve your knowledge? You can get started with little or no electronics experience, and you’ll learn a bunch along the way.
Here are some useful links for pedal building:
Pre-printed circuit boards, plans and kits, circuit diagrams:
- Guitar PCB – boards and some parts
- Build Your Own Clone – kits, boards and parts
- General Guitar Gadgets – kits, boards and parts
- Tonepad – great source for circuit diagrams, and boards
Useful circuit diagrams, background info, forums, etc:
- AMZ – excellent resource from Jack Orman, one of the pioneers of DIY pedal building
- DIY Stompboxes – Great forums and blog
- Fuzz Central – fuzz, wah, compressors, tremolos. Lots of good info.
- GEOFex – los of useful resources
- gaussmarkov: diy fx – some excellent intro resources for pedal circuits
- Beavis Audio – more good guitar effects projects and resources (update- site no longer available, linked via the internet archive)
- Pedal Haven – pedal mods, intro to DIY guitar pedals.
Parts resources (enclosures, jacks, switches, pots, knobs, transistors, caps, resistors, etc):
- Pedal Parts Plus– pretty much everything you’ll need
- Mammoth Electronics– similar to pedal parts plus
- Tayda Electronics – insanely cheap overseas parts resource
- Mouser – huge electronics warehouse
- Digikey – huge electronics warehouse
As mentioned in the video:
- Fulltone OCD – excellent overdrive pedal
- ProCo RAT – Mods from Ruetz and Beavis Audio (update- sites no longer available, linked via the internet archive)
- RadioShack Electronics Learning Lab Model 28-280 – great for prototyping circuits (apparently discontinued, may be available on amazon/ebay)
August 31, 2012 @ 9:05 pm
August 31, 2012 @ 10:50 pm
rk
August 31, 2012 @ 10:50 pm
September 1, 2012 @ 12:30 am
September 1, 2012 @ 8:02 am
September 1, 2012 @ 9:56 am
September 1, 2012 @ 12:20 pm
September 1, 2012 @ 9:40 am
September 1, 2012 @ 3:37 pm
Sketch Me Up! -
September 3, 2012 @ 10:28 pm
[…] Following up on Here is part 2 of my new series on building guitar effects pedals. […]
April and the Summer Music Project Gig -
September 7, 2012 @ 12:22 pm
[…] overdrive- it turned out to be a solder-bridge at the output of the second opamp gain stage. More on pedal electronics, another […]
Drilling the Enclosure -
September 7, 2012 @ 7:17 pm
[…] See more pedal-building resources in the Intro to DIY Pedal Building […]
September 17, 2012 @ 5:24 am
October 3, 2012 @ 1:08 pm
October 4, 2012 @ 9:17 am
October 30, 2012 @ 10:34 pm
Good job John! Very informative!
March 19, 2013 @ 10:44 am
No?
google for : theelectronicsbook and learn the electric circuits hobby.
Good for beginners
Tonefreqhz DIY pedal. Update on build - Les Paul Forums
April 5, 2013 @ 10:26 pm
[…] highly recommend this blog entry and its links. Intro to DIY Pedal Building – Planet Z Also this on op amps ( brilliant) Op Amp Power Supply Considerations: split, single, virtual […]
June 2, 2013 @ 12:59 pm
June 2, 2013 @ 5:54 pm
I’m having a similar problem lately at outdoor gigs with the sun so bright, I can’t see the pedal LEDs anyway, so yes, I do end up playing a bit to listen. But noodling between songs isn’t always appropriate…
June 3, 2013 @ 5:16 am
June 9, 2013 @ 12:46 pm
June 11, 2013 @ 8:59 am
June 25, 2013 @ 4:17 pm
June 25, 2013 @ 4:24 pm
July 9, 2013 @ 6:11 am
July 17, 2013 @ 8:23 am
July 17, 2013 @ 11:55 am
September 11, 2013 @ 10:35 am
September 17, 2013 @ 10:02 pm
September 16, 2013 @ 3:53 pm
September 17, 2013 @ 9:30 pm
January 6, 2014 @ 3:14 pm
really neat free tools for both 3d design and PCB and schematic design you
should have a look at RS Components DesignSpark PCB and Designspark
Mechanical. They are both professional quality and I find DesignSpark a lot
better than Sketchup for component and mechanical assembly type projects.
May 23, 2015 @ 11:57 am
a pedal. Can you tell me why? I thought it only controlled the brightness
of the LED?
July 21, 2015 @ 6:17 am
watching the whole series. One question for you: could one make a business
from selling pedals?
Sketch Me Up! - Planet Z
September 1, 2016 @ 10:56 am
[…] Intro to DIY Pedal Building […]
Drilling the Enclosure - Planet Z
September 1, 2016 @ 11:04 am
[…] Intro to DIY Pedal Building […]
Using GIMP to Create Pedal Artwork - Planet Z
September 1, 2016 @ 11:09 am
[…] Intro to DIY Pedal Building […]
Waterslide Decals - Planet Z
September 1, 2016 @ 11:10 am
[…] Intro to DIY Pedal Building […]
Finishing the Enclosure - Planet Z
September 1, 2016 @ 11:14 am
[…] Intro to DIY Pedal Building […]
Planet Z
September 1, 2016 @ 11:48 am
[…] Intro to DIY Pedal Building […]
DIY Guitar Pedal Building Series - Planet Z
September 1, 2016 @ 11:48 am
[…] Intro to DIY Pedal Building […]