Finishing the Enclosure
Here’s the table of contents for the whole DIY pedal building series:
- Intro to DIY Pedal Building
- Beginner’s Course in Sketchup, Modeling a 125B Guitar Pedal Enclosure
- Drilling a 125B Guitar Effects Pedal Enclosure
- Pedal Enclosure Finishing: Surface Prep, Priming and Painting
- Using GIMP to Create Pedal Artwork
- Printing and Applying Waterslide Decal to Pedal Enclosure
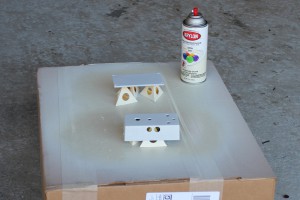
In previous posts, we modeled the enclosure in Sketchup, drilled it, and now we’re ready for paint and artwork. In this video, I talk about options for finishing the enclosure, and choices for art and labels. Then I demonstrate surface prep, priming and painting, in preparation for the waterslide decals.
Some of the resources shown in this video:
- P-touch labeler from Brother
- Adhesive backed window inkjet decal from Papilio, etc
- Papilio inkjet waterslide decal paper
- Moollon etched pedals
- Z-VEX handpainted pedals
- Powder coated enclosures available from Pedal Parts Plus, Mammoth Electronics, etc
- Norton 150-grit multipurpose sandpapers
- Norton synthetic steel wool pads
- Mineral spirits or naptha. Please observe all safety measures- eye protection, gloves, ventilation, etc.
- Painter’s pyramids
- Krylon indoor/outdoor primer white
- Krylon indoor/outdoor paint ivory satin and
- 125b, 1590a, 1590b, 1590bb diecast aluminum enclosures available from Pedal Parts Plus, Mammoth Electronics, etc
clumsybernard
September 28, 2012 @ 6:24 pm
I’ve been stalking this channel for some time now and just wanted to say I love the videos. Lots of interesting projects with clear, concise commentary and good editing.
If I didn’t know better I would guess you were either a scientist or an engineer, John?
John Cooper
September 28, 2012 @ 7:45 pm
Thanks! Yes, you guessed it – I’m a software engineer by day- I do this guitar-related stuff for fun in my free time. More info on the projects, etc, at my blog at planetz. com
manholewisdom
September 28, 2012 @ 6:34 pm
that’s nice but you ought to look into powder coating, It’s lots more durable and small things like that can be one at home. ( with a dedicated oven of course)
John Cooper
September 28, 2012 @ 7:43 pm
Yes, powder-coating is great, as I mentioned at 3:02, but my goal here was to present an easy method for great results, without a dedicated oven, spray equipment, etc.
stmclee
September 28, 2012 @ 8:38 pm
John, I love all of your work shown on this channel.
DJ027X
September 28, 2012 @ 10:28 pm
It would be a lot of work, but i think swirling would look awesome!
youtube.com/watch?v=g3GxEaj7CCE&feature=related
John Cooper
September 29, 2012 @ 2:20 pm
That swirling technique is amazing!
adriantrackssongs
September 30, 2012 @ 7:58 am
You are my hero man, do you take orders for custom pedals?
John Cooper
September 30, 2012 @ 8:50 pm
I’m not currently selling pedals, but contact me via my blog at planetz. com and let me know what you’re thinking of.
Davesintexas
October 1, 2012 @ 3:48 pm
Nice work,..
rehtrem
October 10, 2012 @ 2:09 pm
montana gold spray paint will give you a better uality finish. its ten dollars a can but lost alot longer and they come in various pressures. the color choices are also alot more pleasing to the artistic palette
John
October 11, 2012 @ 6:15 pm
Thanks for the suggestion- I haven’t tried montana sprays. In general, since we’re going to cover up the base color coat with artwork and follow it with a heavy clear coat, I’m not sure it’s worth a big investment in the color coat. But I’d certainly be curious to try it.
rehtrem
October 15, 2012 @ 9:58 am
the only reason it is worth it to me is because i use spray paint from beginning to end of my finishing process, next time i make a pedal i will send you a few pictures of my finishes if you like so you can see what i mean.
John
October 15, 2012 @ 2:50 pm
Sounds good. I’ll look forward to seeing it.
Using GIMP to Create Pedal Artwork -
October 15, 2012 @ 10:10 pm
[…] next step in finishing up the pedal that we’ve modeled, drilled and painted previously, is to prepare the artwork and […]
Niel
March 29, 2022 @ 12:57 am
Hi John. Thanks for the very instructive videos, with a vibe as soothing as the old Bob Ross painting shows (meant as a huge compliment). I downloaded and installed GIMP, which works well, but the GUI is arranged very differently from yours (I’m on Windows). Any tips on/if you customize your GIMP layout? Thanks, Niel
Waterslide Decals -
December 17, 2012 @ 1:21 pm
[…] and apply a durable clear finish. In previous videos, I showed how to model, drill, and paint the enclosure, and design and prepare the artwork and labels in […]
freak77007
December 23, 2012 @ 11:48 am
do you have tips for making footswitch?
John
December 30, 2012 @ 10:18 pm
You mean a simple on/off switch? Or an ABY? These are some of the simplest pedals to make, as there’s nearly no components. Just wires and switches. And it’s only slightly more complicated to add LED’s. Let me know if you have specific questions. I’ll be building an ABY for myself very soon.
freak77007
December 31, 2012 @ 8:50 am
yes, just for channeling between the ‘hard’ and ‘clean’ channel on my amp
John
January 2, 2013 @ 12:03 pm
It depends what the amp is expecting. Some use a momentary switch, but most use a toggle. A toggle footswitch is very simple. Get a DPDT footswitch (around $3 at pedalpartsplus, etc), and a 1/4″ mono jack (around $2). Put those in an enclosure, and wire it up. If you want an on/off LED, you’d need to add a LED bevel and DC power jack (or a battery).
freak77007
January 2, 2013 @ 1:22 pm
awesome after exams first thing i do 😉
EdsGuitarZone
March 8, 2013 @ 6:53 pm
Thanks for this video!
mrmetalmovies69
March 11, 2013 @ 12:00 pm
I’m looking to spray one of my Effects pedals that has already got work done on it
it’s the Digitech Death metal pedal and looking to spray it white and blood splat it how would i go about doing that?
John
March 12, 2013 @ 9:33 am
Here’s what I’d try. Remove the knobs and electronics. Use painters tape to cover the rubber footstep. Lightly scuff the painted surfaces with sandpaper (like 150 grit). Spray with a white primer. Spray several coats of white gloss. Slit wrists and splash blood on it – or get some red paint of your choice on a paintbrush and flick it across the surface 🙂 Reinstall electronics. Rock on.
Jim Curtis
March 18, 2013 @ 4:48 pm
jOhn,
Just as a thought. Years ago, I used to sell industrial products and paints were considered part of our line. I notice that in the video, you shake your can, end to end. As a salesman, we were taught that this would damage the spraying apparatus and that we should hold the top of the can and swing the bottom side to side. Supposedly, depending on how fast you swing the can, back and forth, you would get enough agitation and not damage the sprayer.
Anyway, just a thought; and, who knows, you might get more paint per can. Great work, as usual. Jim
John
March 20, 2013 @ 2:37 pm
Hi Jim,
Wow- I’ve never seen anyone shake a can of paint that way! Guess I’ve been doing it wrong all these years 🙂
-John
bassmanbig
March 27, 2013 @ 12:37 pm
Great Video!! very thorough and helpful.
Thomas Ashworth
April 13, 2013 @ 1:50 pm
When you print your artwork how do you create neat holes where pots will go. (Pre drilled before artwork)
John
April 16, 2013 @ 11:13 am
I model the enclosure in sketchup to figure out where the holes go, then print a drilling template and drill. I demonstrated these techniques in my videos “Beginner’s Course in Sketchup, Modeling a 125B Guitar Pedal” and “Drilling a 125B Guitar Effects Pedal Enclosure”. See my youtube channel playlists or blog for the links to the other videos.
Guido Kritz
June 9, 2013 @ 8:38 am
Thanks for this video! It’s really useful.
Just one question: how long you have to wait between you apply the last spray of primer and you start with the paint? Thanks!
John
June 11, 2013 @ 8:44 am
Just make sure it’s dry. Read the instructions on the can. I gave it a few hours.
nigelderksen
June 25, 2013 @ 12:19 pm
great video
GrayXIII
July 3, 2013 @ 10:24 pm
Great video. I was impressed with how easy to understand this was. Nice work!
BleakAutumnMist
July 10, 2013 @ 7:31 am
great tutorial ! But how do you handle dust and small particles in the air that tend to stick to enclosure
progressiverourke
August 12, 2013 @ 8:04 pm
Hi John, thanks for your great videos! Does waterslide decal paper go well on a spray painted surface?
John
August 13, 2013 @ 2:42 pm
Waterslide decals should work fine over a spray-painted surface.
Jay Lee
August 16, 2013 @ 6:00 pm
Hey. I really find your videos helpful.
Jay Lee
August 16, 2013 @ 6:01 pm
Sorry. I forgot to finish my sentence.. How long do you recommend I spray on clear coat after applying the colored paint coats?
John
August 20, 2013 @ 11:58 am
Just let the paint dry thoroughly. Follow the instructions on the can. I usually wait overnight, before applying clear coats. You can also accelerate the process by baking the finish in a dedicated oven, but I don’t bother with that.
Slownoisedubs
August 29, 2013 @ 5:42 am
Fantastic, really useful. Thanks for posting, now I know where I went wrong 🙂 I will start again.
Nicolas Ayastuy
October 13, 2013 @ 1:38 pm
Excelent and clean tutorial Thanks! it was helpfull!
Kutuplu Kondansator
January 31, 2014 @ 6:20 pm
Thanks for great tutorial! You really help me to build my own stompboxes
and make them look good.
Eduardo Esparra
March 29, 2014 @ 7:39 am
I don’t have any idea what a pedal is or what it does (I’m painting
motorcycle parts) but the prep, materials advise and painting technique
fully apply to my project. Great video! Thank you!
S Leduc
December 29, 2014 @ 6:52 am
A trick for bringing down the raised area where you put down the labels,
where the clear coat is a little more raised, is to sand back some of the
finish until it is flush, then you can hit it with another even coat of
your clear. I recommend using a straight sanding block and starting with
some 400-600 grit so you don’t remove too much product. Remember, do a few
passes, and check often.
Deathlycream
March 9, 2015 @ 5:40 pm
All I have to say is: Thank you. Really.
Sketch Me Up! - Planet Z
September 1, 2016 @ 11:12 am
[…] Pedal Enclosure Finishing: Surface Prep, Priming, Painting […]
Intro to DIY Pedal Building - Planet Z
September 1, 2016 @ 11:20 am
[…] Pedal Enclosure Finishing: Surface Prep, Priming and Painting […]
Drilling the Enclosure - Planet Z
September 1, 2016 @ 11:57 am
[…] Pedal Enclosure Finishing: Surface Prep, Priming and Painting […]
DIY Guitar Pedal Building Series – Planet Z
April 27, 2017 @ 9:59 pm
[…] Pedal Enclosure Finishing: Surface Prep, Priming and Painting […]