Using GIMP to Create Pedal Artwork

Here’s the table of contents for the whole DIY pedal building series:
- Intro to DIY Pedal Building
- Beginner’s Course in Sketchup, Modeling a 125B Guitar Pedal Enclosure
- Drilling a 125B Guitar Effects Pedal Enclosure
- Pedal Enclosure Finishing: Surface Prep, Priming and Painting
- Using GIMP to Create Pedal Artwork
- Printing and Applying Waterslide Decal to Pedal Enclosure
The next step in finishing up the pedal that we’ve modeled, drilled and painted previously, is to prepare the artwork and labels.
In this tutorial, I will demonstrate how to compose your pedal artwork in GIMP, the free GNU Image Manipulation Program. I’m using GIMP 2.8.2 on Windows, but it also runs on Mac and Linux. More
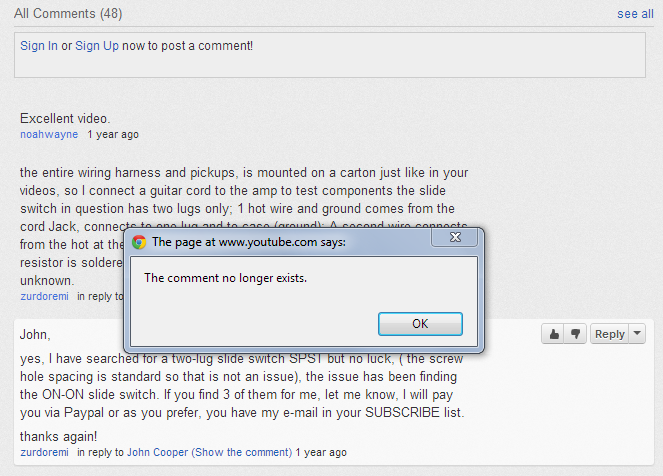
All my YouTube comments have disappeared!
[Update 10/11/2012: What a relief! All my old YouTube comments appear to have been restored successfully. Thanks to the YouTube team for correcting the situation so promptly.]
[Update 10/10/2012: Some news: I received an email from the youtube team saying “A small number of YouTube users may have had their comments deleted as a result of an error on our part”. They sent a link to a reinstatement form, which I submitted, and I now wait with fingers crossed for a speedy and successful recovery. Here’s a link to that form, if you feel you’ve also been affected by this issue!]
Today I noticed something completely depressing! I was looking back at some older comments on one of my videos and I noticed that none of my comments were there. When I clicked on someone’s reply to one of my comments “in reply to John Cooper (Show the comment)”, it popped up a dialog saying “The comment no longer exists”.
Finishing the Enclosure
 Here’s the table of contents for the whole DIY pedal building series:
- Intro to DIY Pedal Building
- Beginner’s Course in Sketchup, Modeling a 125B Guitar Pedal Enclosure
- Drilling a 125B Guitar Effects Pedal Enclosure
- Pedal Enclosure Finishing: Surface Prep, Priming and Painting
- Using GIMP to Create Pedal Artwork
- Printing and Applying Waterslide Decal to Pedal Enclosure
In previous posts, we modeled the enclosure in Sketchup, drilled it, and now we’re ready for paint and artwork. In this video, I talk about options for finishing the enclosure, and choices for art and labels. Then I demonstrate surface prep, priming and painting, in preparation for the waterslide decals. More
Drilling the Enclosure
 Here’s the table of contents for the whole DIY pedal building series:
- Intro to DIY Pedal Building
- Beginner’s Course in Sketchup, Modeling a 125B Guitar Pedal Enclosure
- Drilling a 125B Guitar Effects Pedal Enclosure
- Pedal Enclosure Finishing: Surface Prep, Priming and Painting
- Using GIMP to Create Pedal Artwork
- Printing and Applying Waterslide Decal to Pedal Enclosure
Now that we’ve modeled the enclosure and printed a drilling template, we’re ready to jump out of Sketchup and into the real world.
In this video, I’ll be demonstrating how to accurately drill the holes in a diecast aluminum 125B guitar pedal enclosure, preparing to install the electronics. I’m using the drilling template we printed in part 2. The pedal I’m building is a modified Ross compressor, using a printed circuit board purchased from GuitarPCB. More
Sketch Me Up- Melodies
Dead air. Not good! As I was nearing completion of my epically long video for part 2 in my guitar pedal building series, one of the big items left on my to-do list was to find some appropriate thematic music for the section interludes. Each of the 5 tutorial sections has a table of contents image that sits on the screen for about 16 seconds. At that point in the project, each of these brief interludes was dead-silent.
I had this vague idea that I would compose some short piece of music, and then make five increasingly complex variations to play for each of the five increasingly advanced sections of the tutorial. 16 seconds is not very long- not long enough for a big composition, but maybe long enough for a short melody. This idea lurked in the back of my mind for a few weeks. A couple of aborted attempts just didn’t seem to fit the tone of the video- too perky, too funky, etc.
Inspiration arrived, as it sometimes does, with a new piece of gear. So with brand new Les Paul in hand, and Jamman Delay looper and Vox Ice 9 under foot, I recorded the following series of melodies. Each loop starts with a copy of a previous variation, and adds a little something.
| Sketch Me Up #1 |
| Sketch Me Up #2 |
| Sketch Me Up #3 |
| Sketch Me Up #4 |
| Sketch Me Up #5 |
| Sketch Me Up #6 |
| Sketch Me Up #7 |
| Sketch Me Up #8 |
| Sketch Me Up #9 |
| Sketch Me Up #10 |
| Sketch Me Up #11 |
I’m particularly fond of that last clip, even though it ended up on the cutting room floor. It’s got this crazy riff in it – which may be just a little too complex. 